I'll admit, I bought my Samsung Galaxy S4 back in 2013 mainly based on the great reviews the camera got. I had my DSLR, but wanted something I could put in my pocket, and since there was already going to be a phone in there, it may as well be my fill-in point-and-shoot. Since then, I've taken many thousands of photos with it (and its successor when I lost it in the ocean at a beach in Barbados), and discovered it was even pretty good at taking record shots of rare birds, whether it be through my binoculars or scope. In the back of my head, I've been thinking about making a hands-free adapter to reduce the shake, as seen in this video documenting Nova Scotia's first Western Wood-Pewee: https://www.youtube.com/watch?v=R0iFX8sMAO8
A recent purchase by my friend Dom of a real PhoneSkope (customizable versions here: https://www.phoneskope.com/) brought this back into the forefront of my thoughts. On the website you can choose your phone and scope model, and they'll ship you a case and an adapter for about $78 USD (for my S4 and Kowa 773 with TE10Z eyepiece) - with current conversion rates that works out to about $109 CAD, that doesn't include the $10 CAD shipping fee. Pretty expensive! I figured I could probably make one myself for much cheaper, so I went to work.
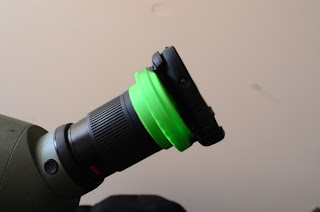
First off, I use a laundry detergent cap as an eyepiece cover, to replace the crappy one Kowa gives you that falls off about every 10 minutes while you're in the field. My friend Barb Charlton showed me this trick, and there are a few brands that fit pretty snugly over my Kowa's eyepiece. This one happens to be Green Works. Cost: FREE, assuming you buy laundry detergent anyway
Given that most of us do laundry more than once in a lifetime, I had an extra cap lying around, so I sliced off the top of it, leaving the bit that actually screws on to the bottle.
Now, I needed something to attach it to - this is where the belt clip from my Otterbox case that I bought with my camera comes in. I don't use it for anything, as my phone fits perfectly well in my pocket, so I figured I could modify it a little bit. I made a mark at the top where I'd make a hole for the camera to peek through. Cost: FREE (given that I don't use this - cost of an otterbox case including the clip is about $60 and well worth it for protecting your phone!).
I then used a drill (bit was too small so I had to bore out the hole a little with my pocket knife) to make a hole for the camera - I used a 1/4 inch bit, but I think a 1/2 inch would be perfect. This left me with the two pieces of the puzzle. Cost: still free as I borrowed a drill from work
To attach them together, I marked where on the cap the clip case would need to fit to line up with my scope's eyepiece, then used some gel super glue (the same stuff I use to glue harnesses on radio-tags). Cost: about $4 for the glue bottle, but I used a tiny amount and the rest will go to making harnesses for my research... so about $1!
It took a couple layers and a day or so of drying, but it eventually attached properly. I then put a few pieces of electrical tape on the inside of the cap to ensure a snug fit and keep the camera from slipping when it's mounted on the scope. You'll notice the glue burned the plastic a bit, and I also used a lighter to try melting the plastic bits together (it didn't work, don't try it!).
Since the belt clip is meant for the Otterbox case, it clips in nicely without having to change the case on my phone like you would on a phoneskope adapter. Simply pop it on and wiggle into the correct position, and it seems to provide a pretty solid view!
Note I just finished this about 15 minutes ago so haven't had a chance to field test it yet, but my hopes are high! Total cost to make this was about $1 (using spare parts; it'd be more if you went out and bought an Otterbox just to do this...), and took about 20-30 minutes of my time over the course of a day. I kind of doubt it'll be as durable as a real PhoneSkope adapter, but the breakable parts (laundry cap and glue seal) are easily replaceable!
Sunday, May 14, 2017
Subscribe to:
Posts (Atom)


